How To Tie a Tie: 7 Knots to Know
Want to learn how to tie a necktie? Here are 7 easy knots, with visual instructions.

From Fumbling to Fabulous: Mastering the Art of the Necktie
Ah, the necktie. A symbol of sophistication, professionalism, and... utter confusion for anyone who's ever stared blankly at a pool of fabric, wondering where on earth to begin. Fear not, fellow sartorial novices! Taming the necktie is not as daunting as James Bond might have you believe. It's a skill that, with a little practice and the right guidance, can elevate you from fumbling fashion faux pas to a confident, well-dressed individual.
The Four-in-Hand: Your Gateway to Tie Triumph
Think of the four-in-hand knot as the gateway drug to necktie mastery. It's simple, straightforward, and perfect for any occasion, from a casual office meeting to a fancy dinner date. Plus, it's surprisingly easy to learn, even if your coordination skills are more "flailing limbs" than "graceful ballet."
Step 1: The Lay of the Land
Imagine your tie as a landmass waiting to be explored. The wide end is the mighty Mount Everest, while the skinny end is the humble plains. Place the tie around your neck, with the Mount Everest end hanging lower than the plains. Now, cross the plains over the mountain, creating an "X" at your chest.
Step 2: Tunneling Through the Mountain
Next, grab the plains and tunnel them under the mountain, pulling them up and out the other side. This creates a loop around your neck, with the plains now resting on top of the mountain.
Step 3: The Big Loop-Around
Take the mountain and loop it around the back of the plains, then bring it up through the loop in front of your neck. This is where things get a little tricky, but trust the process!
Step 4: The Tightening Act
Now, grab the mountain and pull it gently downwards, tightening the knot while simultaneously pushing the plains upwards. You want the knot to be snug but not suffocating. Remember, this is a necktie, not a noose!
Step 5: The Finishing Touches
Adjust the knot until it's centered and the collar of your shirt is lying flat. Voila! You've scaled Mount Necktie and emerged victorious.
Beyond the Basics: Exploring the Landscape of Tie Knots
For the adventurous souls who crave more than just the four-in-hand, there's a whole world of tie knots waiting to be discovered. Each with its own unique personality, these knots can add a touch of individuality and flair to your ensemble.
The Half Windsor: The Bold Alternative
The half Windsor is a step up from the four-in-hand, offering a slightly larger and more symmetrical knot. Perfect for formal occasions or when you want to project an air of confidence and authority.
The Full Windsor: The Ultimate Power Move
The full Windsor is the undisputed king of tie knots, synonymous with sophistication and high-level meetings. It's a larger and more complex knot, requiring more skill and patience to master. But for those who succeed, the reward is a knot that exudes pure power and gravitas.
The Bowtie: The Timeless Classic
And then there's the bowtie. The epitome of elegance and sophistication, the bowtie is a timeless accessory that can add a touch of class to any outfit. Whether you're channeling your inner James Bond or simply attending a black-tie event, the bowtie is a surefire way to turn heads.
Practice Makes Perfect
Remember, like any skill, mastering the art of the necktie takes practice. Don't be discouraged if your first attempts look more like a tangled mess than a stylish accessory. Keep practicing, experiment with different knots, and soon you'll be tying neckties like a seasoned pro.
So, what are you waiting for? Grab your favorite tie, embrace the journey, and get ready to elevate your sartorial game from fumbling beginner to necktie ninja!
Here are some step-by-step instructions to tie the most popular knots.
The Windsor Knot
The Windsor knot is a wide, triangular knot that's well suited for spread or cutaway collars. It's also one of the most popular knots, thanks to its symmetrical shape and clean lines. If you're looking to make a good impression, the Windsor is a great choice. Here's how to tie it:
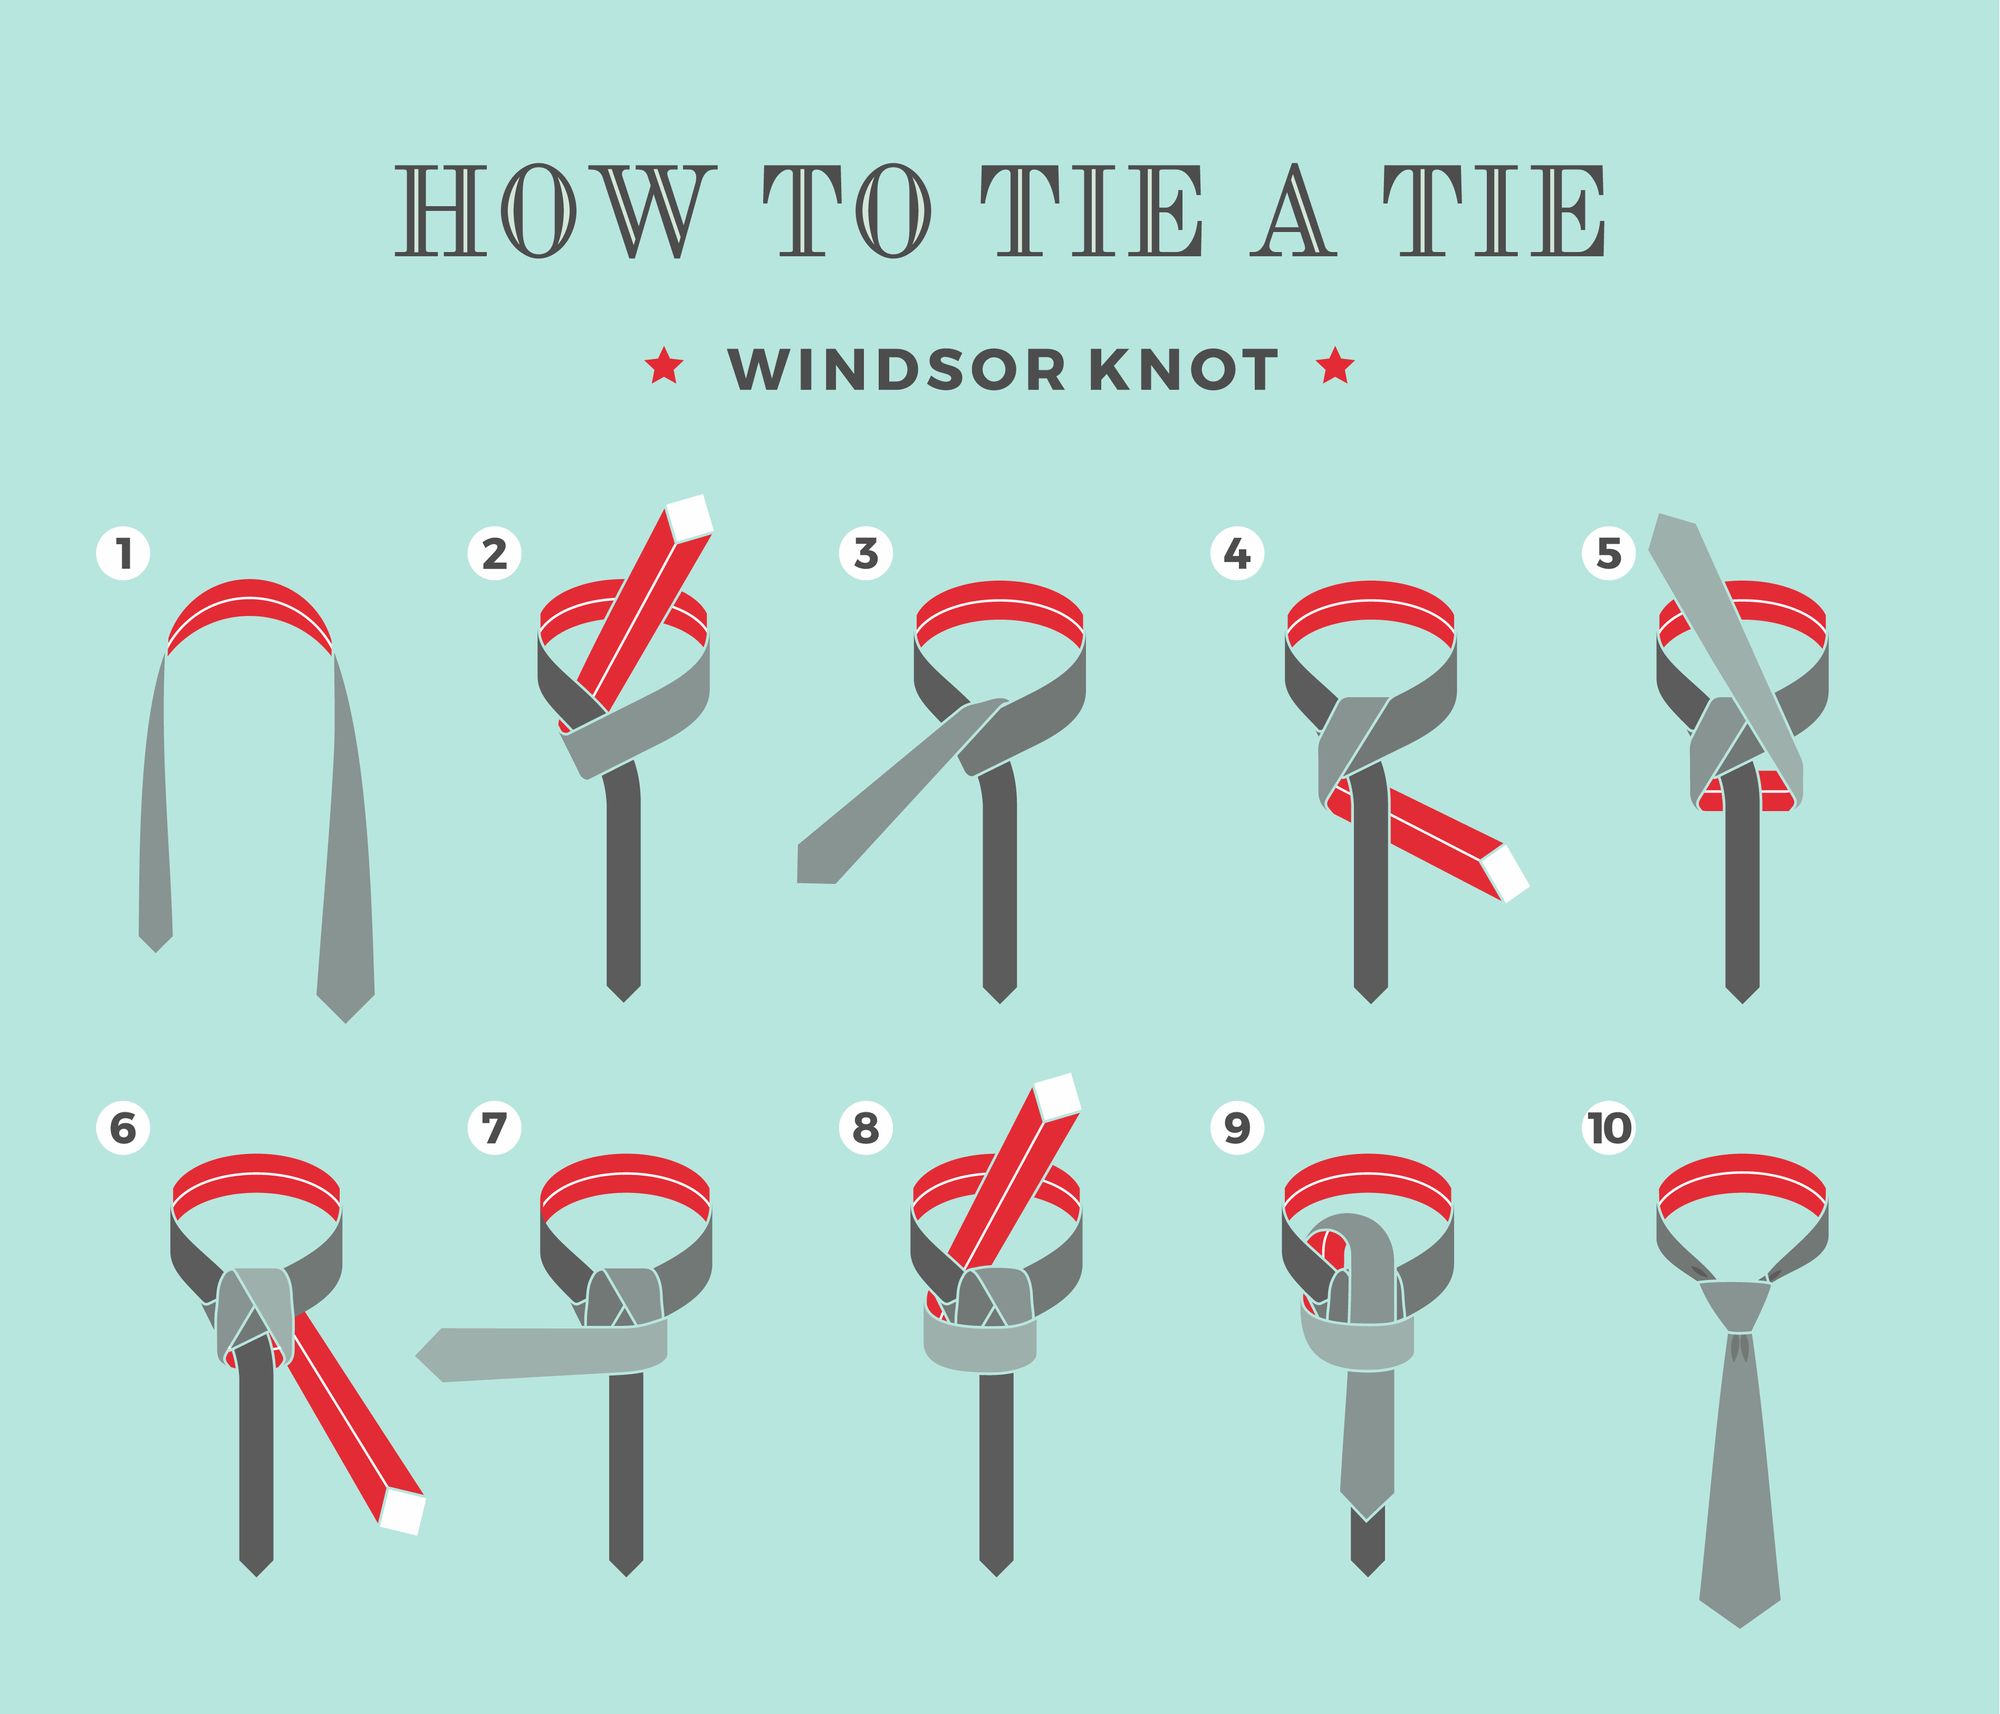
- Start with the tie inside out and draped around your neck so the wide end hangs down about 12 inches below the narrow end.
- Cross the wide end over the narrow end and bring it up through the loop around your neck.
- Pull the wide end all the way through, then tighten by holding on to both ends and pushing up towards your chin.
- Flip the wide end over the top of the narrow end, then poke it underneath.
- Hold it in place with your thumb, then bring the wide end back down through the loop around your neck.
- Pull the wide end all the way through and tighten.
If you'd like a slightly larger knot, simply repeat steps 4-6 one more time before tightening.
The Half Windsor Knot
Most men learn how to tie a tie by mimicking someone else, whether it be their father, older brother, or a friend. While this is the most common way to learn, it isn't always the most effective.
The half Windsor knot is a versatile knot that can be used for both casual and formal occasions. Here's a step-by-step guide on how to tie a half Windsor knot:
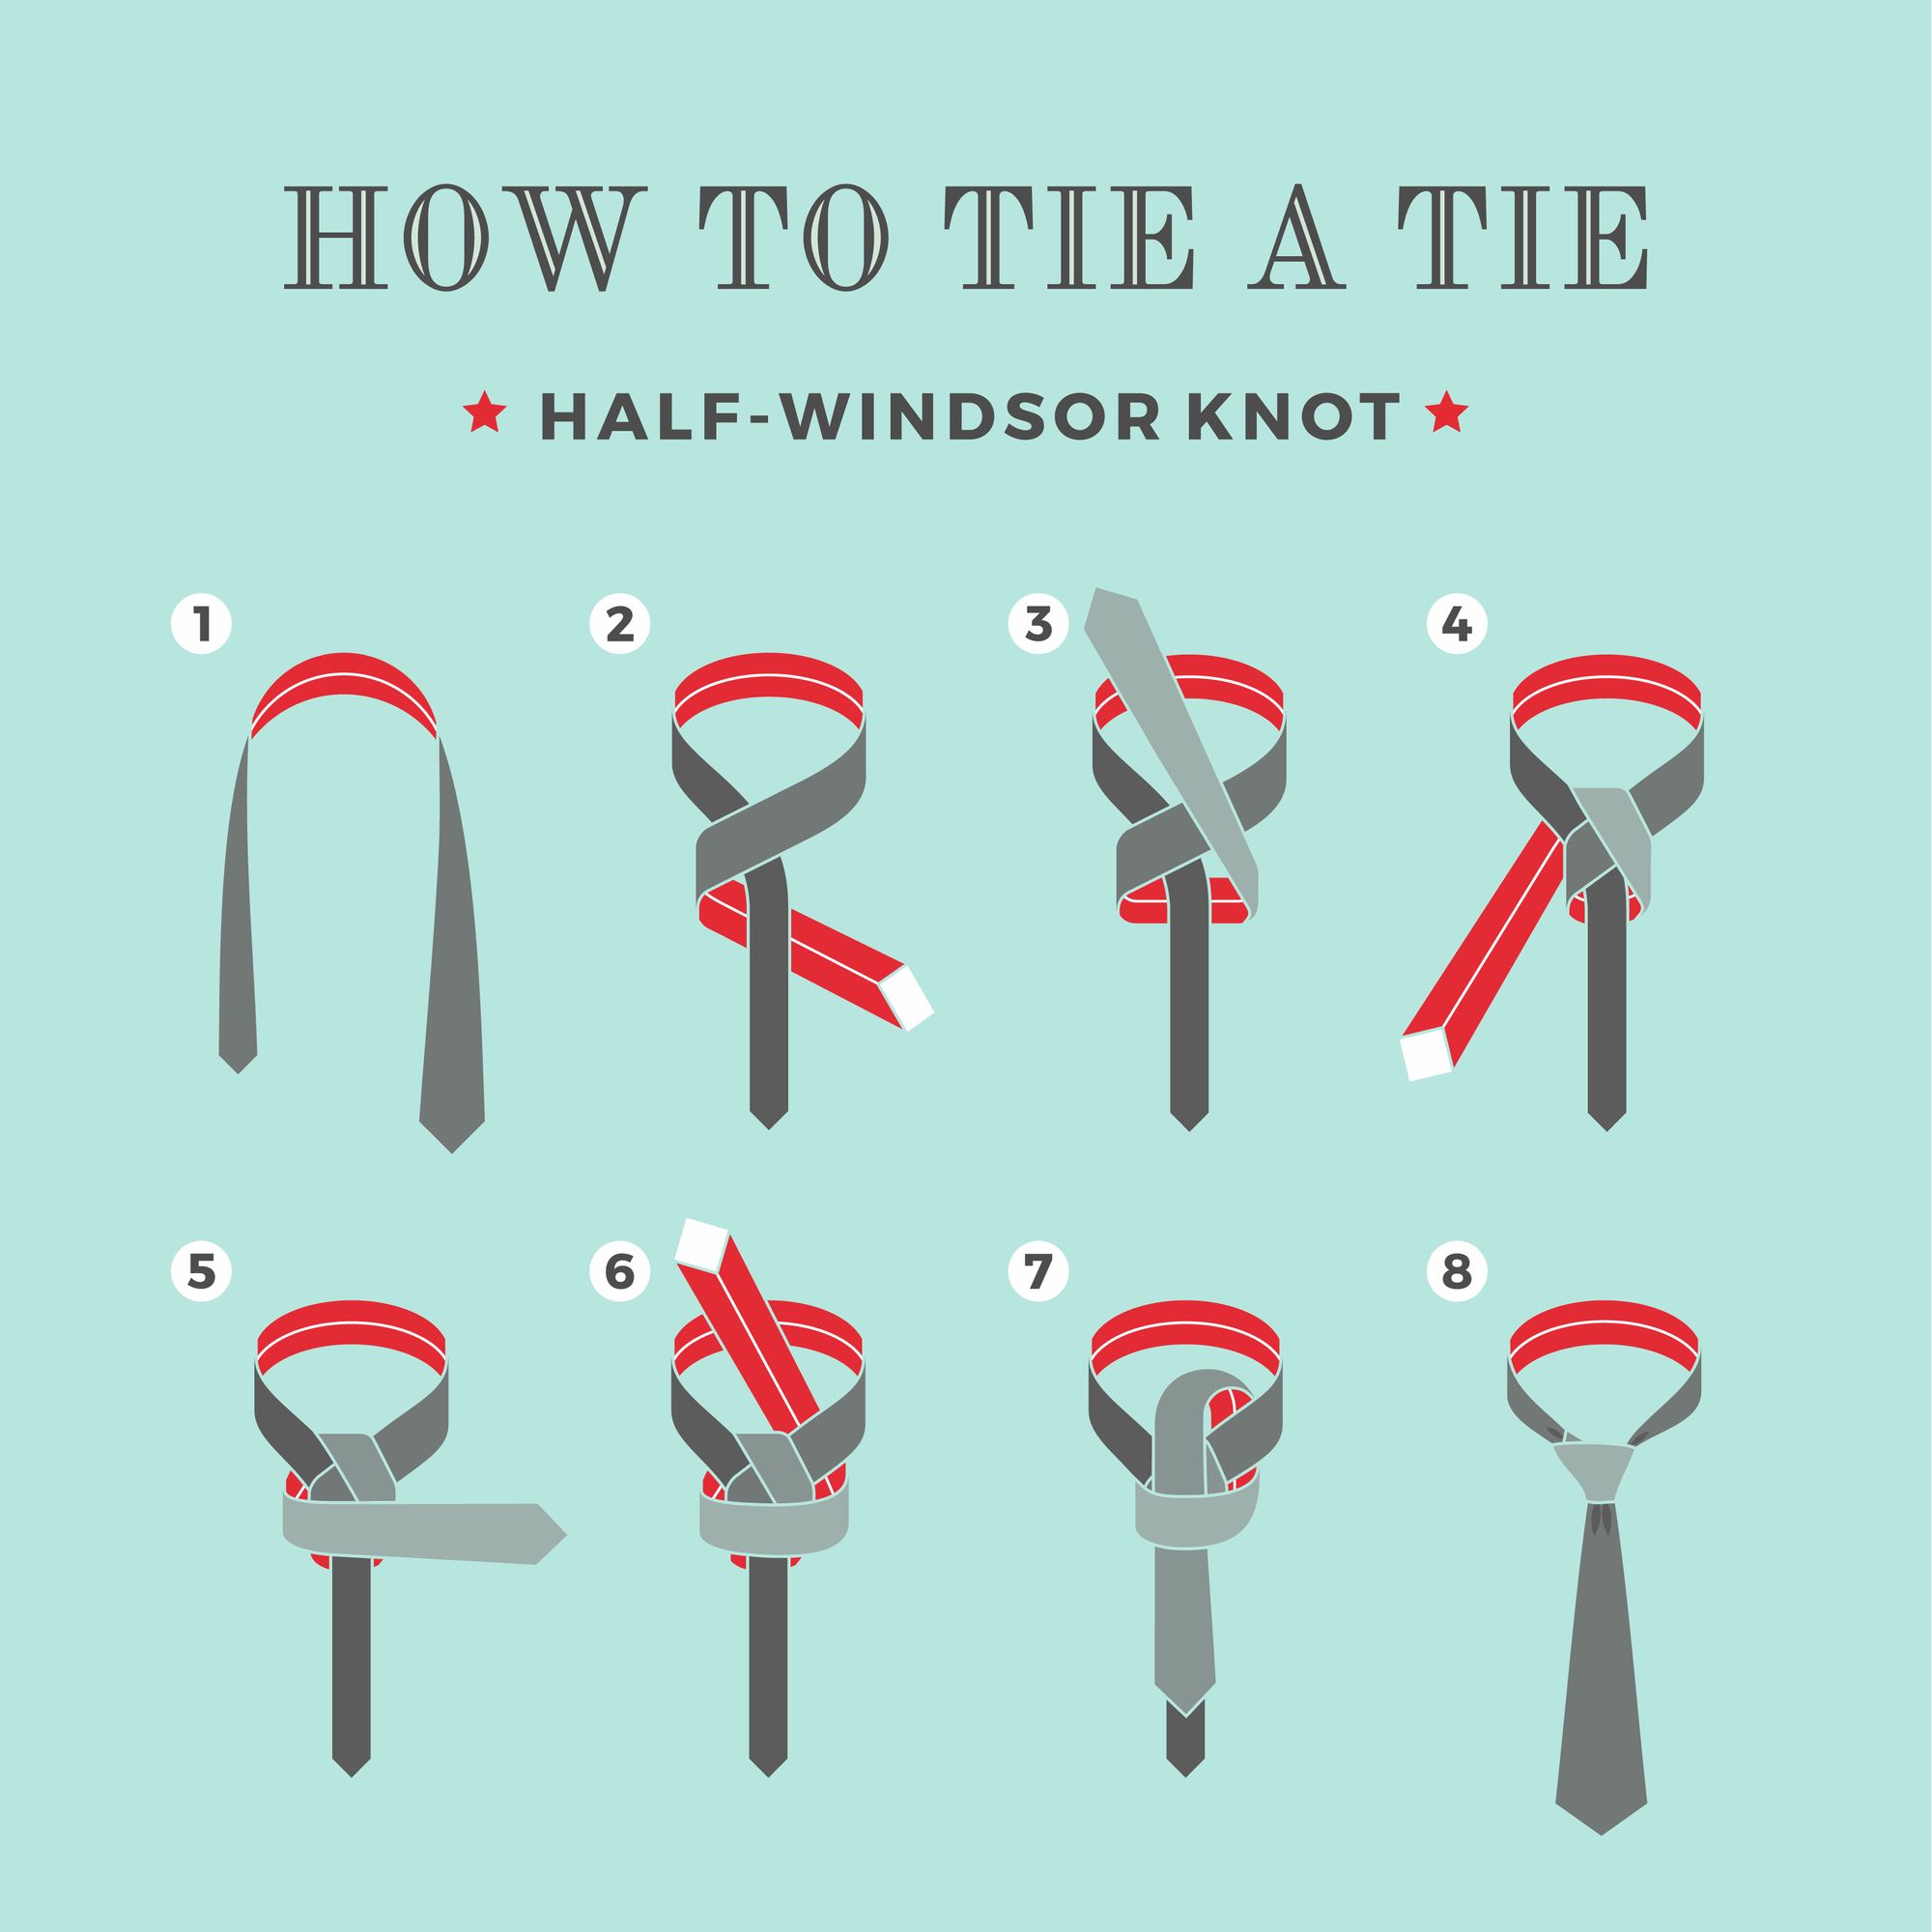
- Start with the tie draped around your neck with the seam facing out and the wide end hanging down about 12 inches lower than the narrow end.
- Cross the wide end over the narrow end and pull it up through the loop around your neck.
- Now bring the wide end back under the narrow end and then up through the loop again. You've now made the first half of the knot.
- Bring the wide end down through the loop and pull it up so that it lies on top of the narrow end, forming a second loop.
- Now bring the wide end back down through the second loop, behind the knot this time.
- Finally, bring the wide end up through the second loop, and pull it snug.
- Adjust the tie so that all four corners are even, and then tighten by pulling on each corner in turn.
- Now you have a Windsor knot!
The Four-In-Hand Knot
Tying a necktie is not as difficult as it may seem. There are different ways to tie a necktie, but the half-four-in-hand knot is one of the most popular knots. To tie a half four-in-hand knot, follow these steps:
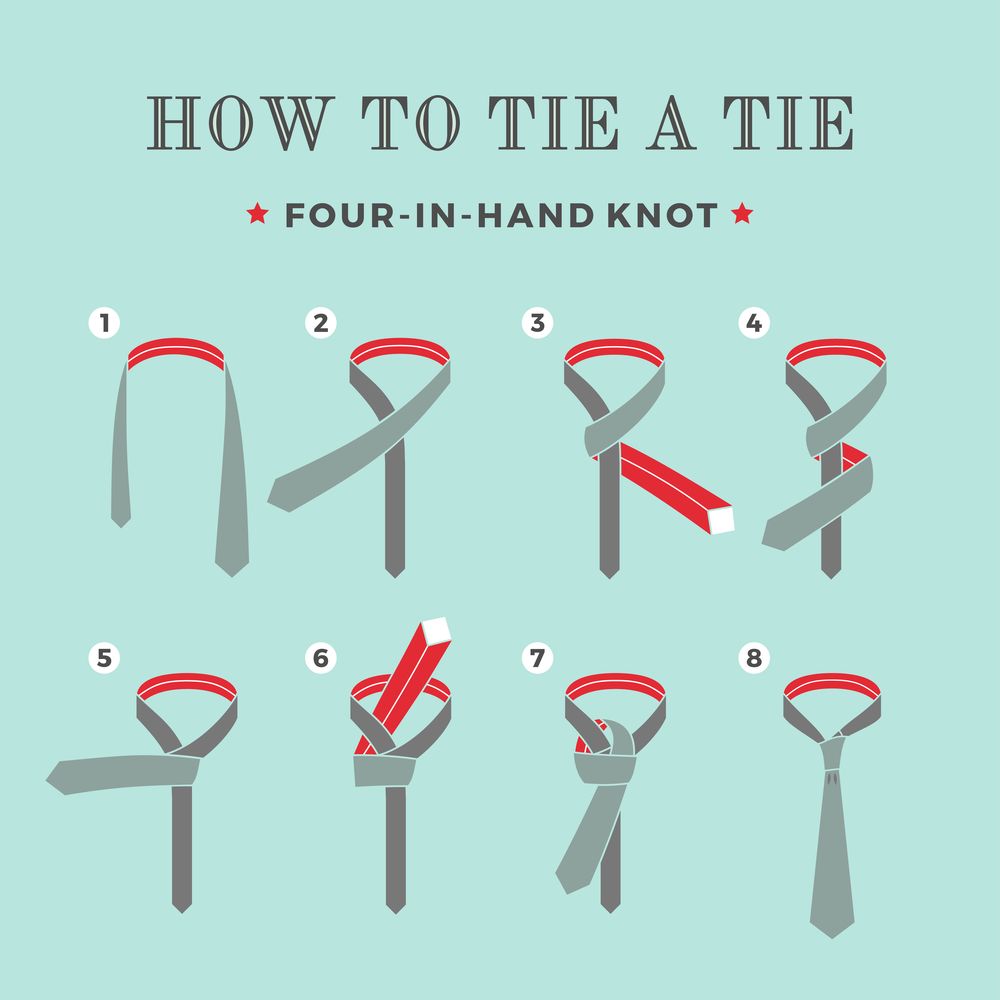
- Start with the tie around your neck and the wide end of the tie on your right side.
- Cross the wide end over the narrow end and pull it up through the loop around your neck.
- Hold on to the wide end with your index finger and pull it down through the loop you just created.
- Now poke the wide end through the hole at the center of the knot in front of you, from top to bottom.
- Hold onto the wide end again with your index finger and pull it through the loop below.
- Pull on both ends of the tie to tighten the knot.
- Adjust your shirt and tie, then you are set to go!
The Prince Albert Knot
With a little practice, you can master tying the Prince Albert knot on a men's necktie. The following instructions will show you how to do it.

- First, make sure the tie is the correct length. It should reach the top of your trousers' waistband, with about two inches (5 cm) left over.
- Next, put on the shirt and button it up to the collar.
- Then take hold of the tie at the wide end, and slide it around your neck so that the narrow end hangs down in front.
- Now bring the wide end over the narrow end, and tuck it underneath.
- Then pull it through the hole that has been created, and tighten it by holding on to both ends and pulling downwards.
- Finally, adjust the knot so that it sits in the center of your collar, and you're done!
The Kelvin Knot
is a lesser-known way to tie a tie, but it produces a much cleaner look than the standard four-in-hand knot. It's named after Lord Kelvin, who supposedly invented it in the 19th century. Here's how to do it:
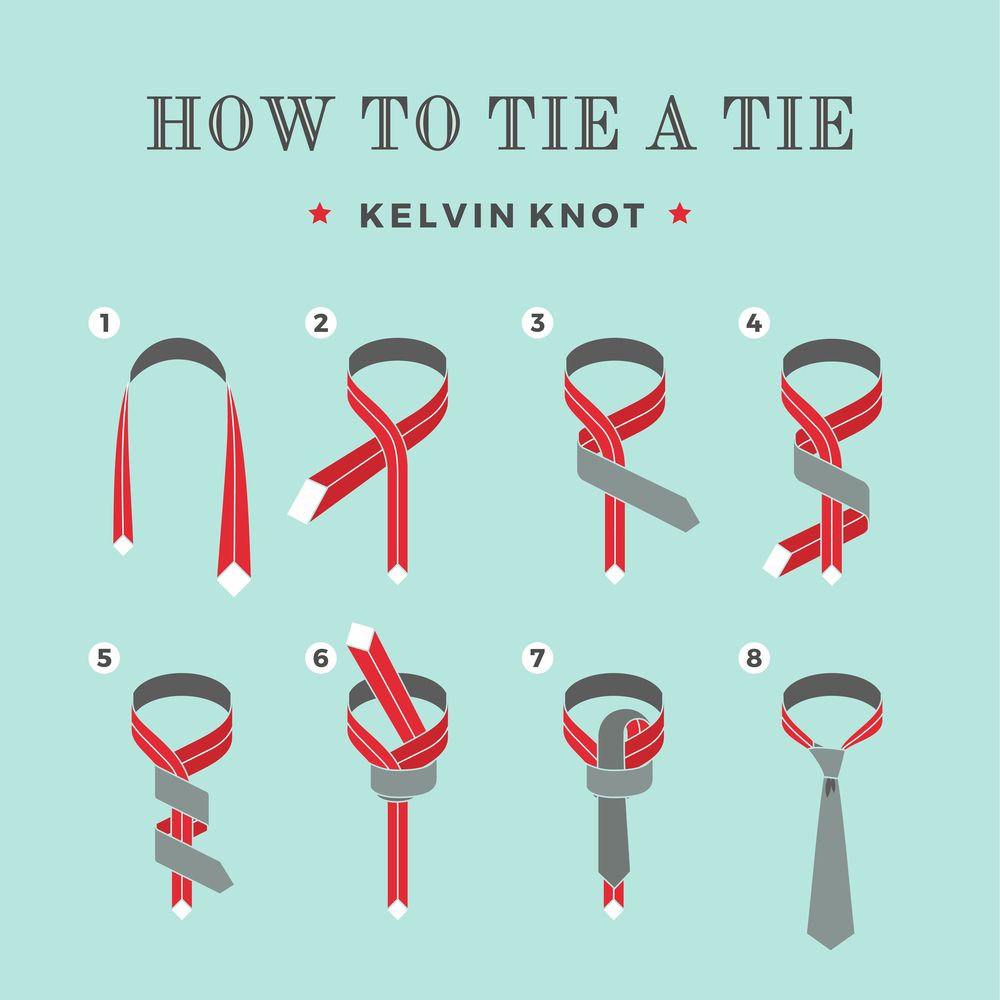
- Start with the tie inside out and reversed, so the seam is facing out and the wide end is on your right.
- Cross the wide end over the narrow end, and bring it up through the loop around your neck.
- Now poke the wide end down through the front of the knot you've just made.
- Bring the wide end around behind the narrow end, and poke it up through that loop again.
- Put your index finger inside the resulting hole, then poke the wide end down through it.
- Pull on the wide end and tighten up the knot. You're done!
The Oriental (Simple) Knot
Also known as the Shanghai or Chinese knot, is a type of necktie knot that is popular in East Asia. It is a relatively simple knot to tie and is similar to the four-in-hand knot, but with an extra step. The Oriental knot is a good choice for those who want a bit more visual interest in their tie, but don't want to go too overboard. Here's how to tie an Oriental knot:
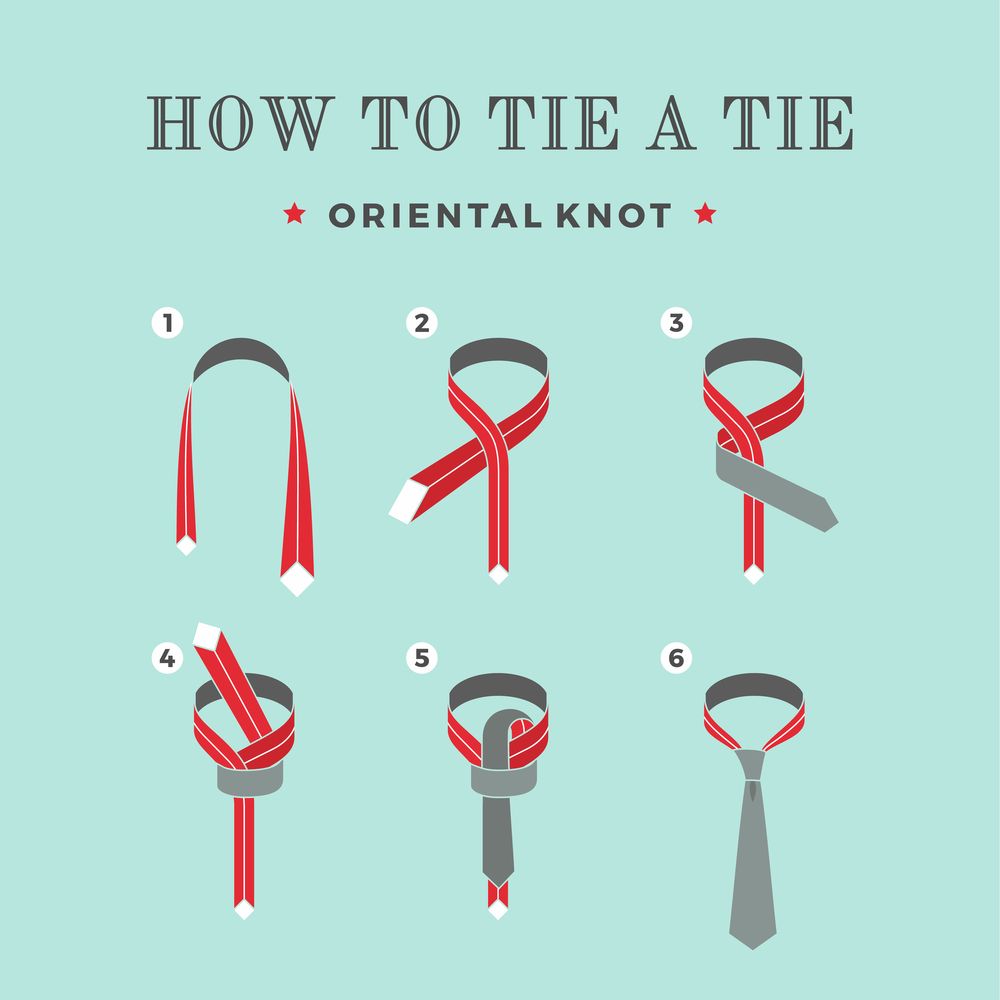
- Start with the tie inside out and draped around your neck so that the wide end hangs down about 12 inches below the narrow end.
- Cross the wide end over the narrow end and pull it up through the loop around your neck.
- Bring the wide end over the top of the narrow end and tuck it underneath.
- Bring the wide end up through the loop around your neck and slide it over the narrow end.
- Pull the knot tight and adjust to your liking.
The Pratt-Shelby Knot
The Pratt-Shelby Knot is a variation of the Pratt knot and is often considered to be more aesthetically pleasing. The key difference between the two knots is the position of the small triangle that is created when the tie is tied.
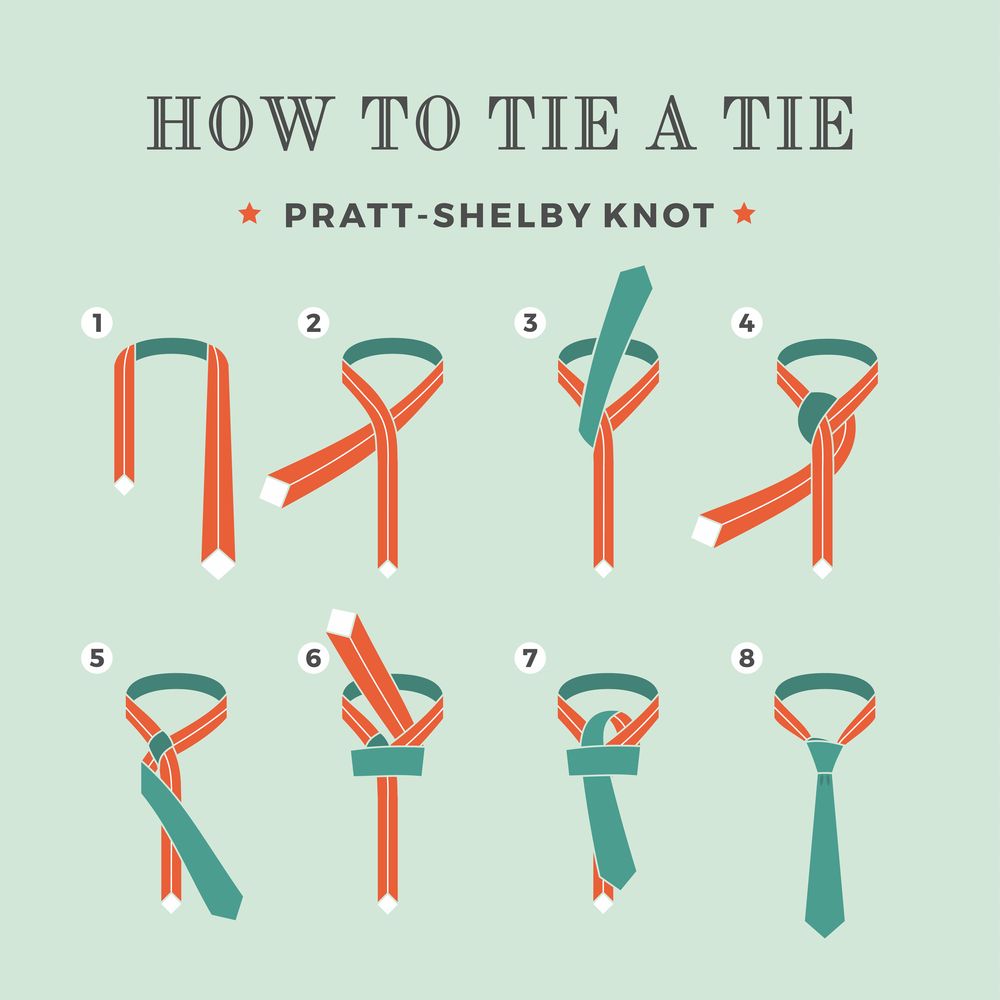
- start with the tie inside out and positioned so that the wide end hangs about 12 inches below the narrow end.
- Then, cross the wide end over the narrow end, and bring it up through the loop around your neck.
- Next, poke the wide end through the hole at the top of the knot, and then down through the loop around your neck again.
- Now you will have formed a small triangle with point facing downwards.
- To complete the knot, simply tuck the wide end underneath the narrow end, and then pull tight.
Tying a Bow Tie
Want to stand out from the crowd? Be bold and rock the bow tie.
A bow tie is a type of necktie that is distinguished from other ties by its unique shape. The ends of the tie are tied together in a loop, and the resulting bow can be worn on either side of the neck. Bow ties are traditionally worn with formal attire, but they can also be worn with casual clothing.
There are two main types of bow ties: self-tie and pre-tied. Self-tie bow ties are more difficult to put on, but they provide a more polished look. Pre-tied bow ties are easier to put on but do not look as neat.
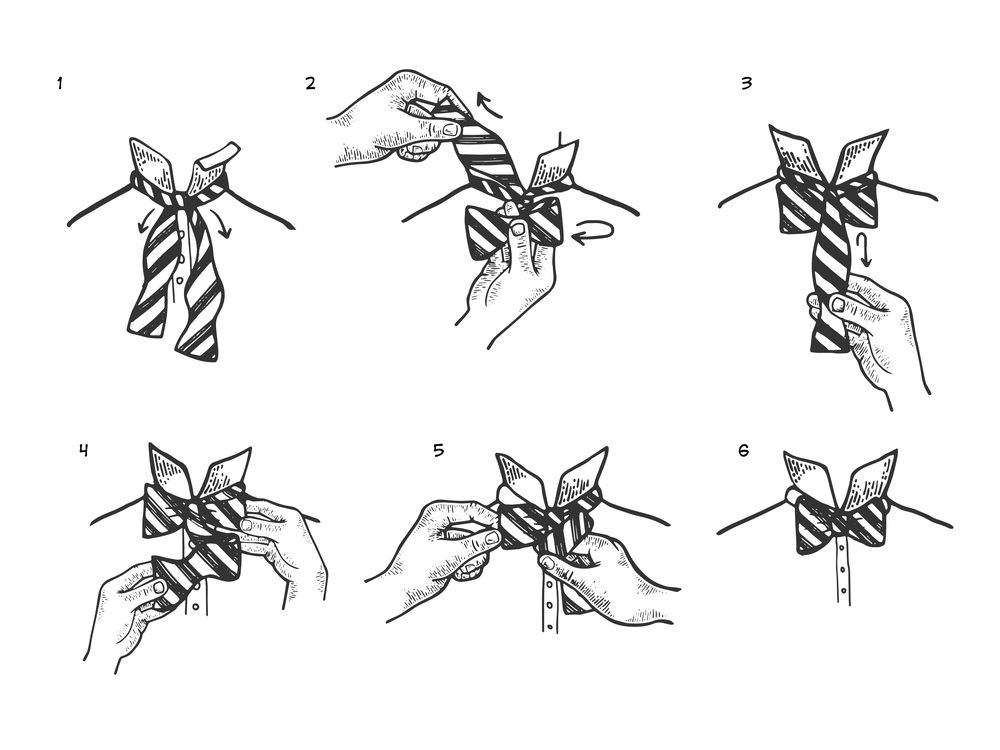
- To tie a self-tie bow tie, start by adjusting the length of the tie so that it hangs evenly around your neck.
- Then, cross the long end of the tie over the short end and tuck it underneath.
- Bring the long end back across and pass it through the loop you created.
- Then, bring the long end down under the horizontal piece of fabric that sticks out.
- Tighten the bow by pulling on both ends of the tie until all of the fabric is gathered into a neat, even shape.
Common questions about tying a tie.

Which types of ties are more popular today, and why?
There are many different types of ties, and what is popular today may change over time. Some common types of ties include bowties, knots (such as a Windsor knot), loops (such as a loop knot), thin ties, and thick ties.
It depends on the style that you are trying to achieve. Some people prefer thin ties because they are more comfortable to wear, and others prefer thick ties because they look better. It is also possible to mix different types of ties together! There are many different ways to tie a tie, and it depends on the style that you are trying to achieve. Some common methods include:
- Bowties can be tied in several different ways, including with a regular bowtie knot or an “overhand” bowtie knot.
- Loops can be tied in several different ways, including with a simple loop knot or a more complicated reef knot.
- Thin ties can be tied in several different ways, including with a standard Windsor knot or various other knots.
- Thick ties can also be tied in multiple ways, including with a standard knot or a more complicated knot, such as overhand knots. - It is also possible to mix different types of ties together! For example, you can tie a thin tie around your neck with a loop knot, or tie a thick tie around your waist with a standard knot.
In your opinion, what is the easiest knot to tie?
Certainly the easiest is the four-in-hand.
For beginners, what is the simplest knot?
Four-in-hand once again.
The fanciest knot to tie?
The full Windsor is usually regarded as the most formal and fanciest tie knot.
What is the best tie knot?
There are many tie knots, but the best one depends on the shirt you're wearing and the occasion. If you want something less formal, go with the four-in-hand. Choose a half or full Windsor if you want something more formal.
Is there a recommended length for a tie?
Just above the belt buckle.
For a wedding, what is the best tie knot?
Consider a full Windsor for the wedding, since it is a formal event.
Tieing a necktie: not as difficult as it seems.
In conclusion, tying a necktie is not as difficult as it may seem. With a little practice, anyone can do it. The key is to take your time and be patient. Once you get the hang of it, you'll be able to do it in no time.